This post was originally published in French only. We translated it in 2026 so the archive reads the same in both languages. Read the original →
June has a special flavour this year on the Hackfest blog: four articles on assembly programming will be published, one each week, and the month will be capped off with a HackerSpace presentation on the subject. Hopefully you'll learn something! Here is the third article in the series. The articles from week 1 and week 2 are also available.
So far, nothing we have done lets us build very elaborate applications. We have talked about the structure of the processor as well as the basic structure of applications themselves. No consideration has yet been given to the logical control of an application's execution. Today, that changes. Today's theme: controlling the application's execution flow.
Before going any further, a quick look back at the first article in the series is in order. Since we will mainly be discussing the eip register, I suggest taking a few minutes to refresh your memory on how it works. You should all recognize the following diagram.
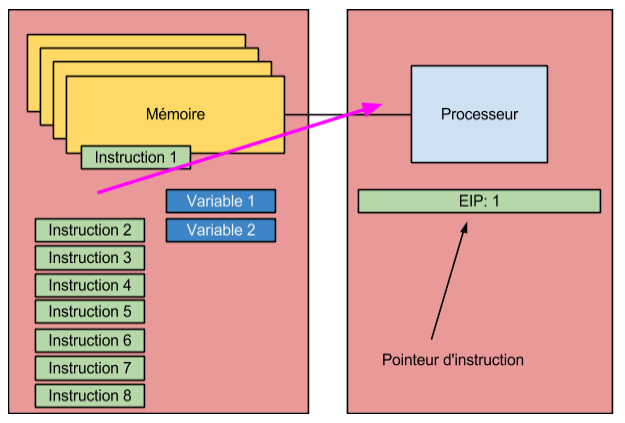
As the previous diagram shows, the eip register points to the next instruction to be executed by the processor. So in reality, when we alter the logical course of an application's execution, we will indirectly be modifying the value of the eip register so that we can decide ourselves which instruction runs next, without the execution flow being linear. To start, in order to understand the execution flow of a "flat" application, in the sense that it has no variations, we will take the application we programmed last week. However, to get a view of the addresses used during execution, we will disassemble the binary file we prepared last week. To do the disassembly, we will use the objdump utility. More specifically, we will use the -D option, which disassembles all sections of a binary file. The result of this command is shown in the following figure.
|
$ objdump -D movingDataProject movingDataProject: file format elf64-x86-64 Disassembly of section .text: 00000000004000b0 <_start>: 4000b0: b8 c8 00 60 00 mov $0x6000c8,%eax 4000b5: 67 83 00 32 addl $0x32,(%eax) 4000b9: 67 ff 00 incl (%eax) 4000bc: b8 01 00 00 00 mov $0x1,%eax 4000c1: bb 00 00 00 00 mov $0x0,%ebx 4000c6: cd 80 int $0x80 Disassembly of section .data: 00000000006000c8 : 6000c8: ff 00 incl (%rax) ... Disassembly of section .stab: 0000000000000000 : 0: 01 00 add %eax,(%rax) 2: 00 00 add %al,(%rax) 4: 00 00 add %al,(%rax) *****************************Code omitted********************************* |
As you can see, all of the application's sections have been disassembled. In our case, we are only interested in the _start label of the .text section. You will notice that the spots where we used memory addresses have been changed and that those memory addresses are now in the code. When the application was linked, the labels were replaced with the real memory addresses. You can also see the instruction addresses at the beginning of each line. For example, the instruction mov $0x6000c8, %eax is at address 4000b0. With the disassembled code in hand, we will launch the application with gdb and set a breakpoint on the _start label. Once we hit the breakpoint, we will display the register values. The following figure shows all of the steps described above.
|
$ gdb movingDataProject GNU gdb (Ubuntu/Linaro 7.4-2012.04-0ubuntu2.1) 7.4-2012.04 Copyright (C) 2012 Free Software Foundation, Inc. License GPLv3+: GNU GPL version 3 or later This is free software: you are free to change and redistribute it. There is NO WARRANTY, to the extent permitted by law. Type "show copying" and "show warranty" for details. This GDB was configured as "x86_64-linux-gnu". For bug reporting instructions, please see: Reading symbols from movingDataProject...done. (gdb) break _start Breakpoint 1 at 0x4000b0: file movingDataProject.s, line 18. (gdb) run Starting program:movingDataProject Breakpoint 1, _start () at movingDataProject.s:18 18 movl $nbPommes, %eax ←Next line to be executed (gdb) info registers rax 0x0 0 rbx 0x0 0 rcx 0x0 0 rdx 0x0 0 rsi 0x0 0 rdi 0x0 0 rbp 0x0 0x0 rsp 0x7fffffffe1f0 0x7fffffffe1f0 r8 0x0 0 r9 0x0 0 r10 0x0 0 r11 0x200 512 r12 0x0 0 r13 0x0 0 r14 0x0 0 r15 0x0 0 rip 0x4000b0 0x4000b0 <_start> eflags 0x202 [ IF ] cs 0x33 51 ss 0x2b 43 ds 0x0 0 es 0x0 0 fs 0x0 0 gs 0x0 0 (gdb) |
Don't forget: on a 64-bit system, the eip register is called rip. Looking at the register information clearly shows that the next instruction to be executed is at address 4000b0. Let the program run step by step while watching the value of the eip register against the addresses listed in the disassembled version of the application. It will be easy to understand the link between the eip register and the next instruction to execute. OK, on to the "serious" stuff. Today's goal is to learn how to implement conditional structures as well as loops. Pretty simple, really! But with these few building blocks, you will have what you need to start understanding an application's logic when you look at its assembly code.
Conditional Structure
The first structure we will talk about, the if, is fairly simple to produce in assembly. However, to give ourselves a basis for comparison, we will start by writing a C version of the test application we are going to develop in assembly. So start by programming the following example in C and compile it (gcc -o fichier.c).
|
int nbPommes[2] = {200, 100}; int main(){ if (nbPommes[0] > nbPommes[1]){ nbPommes[0]++; } return 0; } |
The application has an array containing two numbers. If the first element is greater than the second, the first element is incremented. We will now translate this application into assembly. Here is the assembly code for a very similar application.
|
.section .data nbPommes: .int 200, 100 .section .text .globl _start _start: movl $1, %esi movl nbPommes(,%esi,4), %eax cmpl %eax, nbPommes jle less incl nbPommes less: movl $1, %eax movl $0, %ebx int $0x80 |
The first thing you should notice in this application is the .data section, which contains a declaration we haven't talked about until now. Declaring a variable in this form actually uses several contiguous memory cells. In short, it's as if we had made an array in C. In this case, the array contains the numbers 200 and 100. The second unfamiliar instruction is movl nbPommes(,%esi,4), %eax. This instruction, which reaches a memory range, breaks down as follows:
baseAddress ( offset, index, size)
The base address is the address the instruction works from. The offset represents a displacement in memory from the base address. In our case, since we don't want an offset, this parameter is left empty. The index represents the index in the array of the element we're looking for, and the size represents the size in bytes of the data to be fetched. In this case, the instruction reaches the number "100". This number is copied into the eax register. Finally comes the series of instructions that handles the condition. I copied the code into the following box.
|
cmpl %eax, nbPommes jle less incl nbPommes less: movl $1, %eax movl $0, %ebx int $0x80 |
The cmpl operation compares two numbers. In this case, the number held in the eax register (100) is compared to the number in the first index of the nbPommes variable. With the GNU assembler, the comparison is always made based on how the second number relates to the first number (more on that in a moment). The next instruction, jle less, "jumps" to the code at the "less" label if the condition is met. In this case, the condition is "jle", so "Jump Less or Equals". So if the second number given to the comparison operator is smaller than the first number, the jump is taken and execution continues from the "less" label. In that situation, the line immediately following the jle command would not be executed. The following table shows a truth table applied to the operator.
|
cmpl |
%eax |
nbPommes |
Result |
|
100 |
200 |
> | |
|
200 |
100 |
< | |
|
100 |
100 |
= |
So you can see that, in reality, the result of the cmpl operation reads from right to left. Also, notice that because of the language's design philosophy, we are actually checking the "opposite" of what we check in the C version of the application. You are strongly encouraged to run this little application with different values to get a feel for how the comparison operators work.
To wrap up this example, the following figure shows the disassembled code of the C version of the small example program. Of course, there are a few differences, but the basic concepts seen in this example are all there.
|
00000000004004b4 : 4004b4: 55 push %rbp 4004b5: 48 89 e5 mov %rsp,%rbp 4004b8: 8b 15 5a 0b 20 00 mov 0x200b5a(%rip),%edx # 601018 4004be: 8b 05 58 0b 20 00 mov 0x200b58(%rip),%eax #60101c 4004c4: 39 c2 cmp %eax,%edx 4004c6: 7e 0f jle 4004d7 4004c8: 8b 05 4a 0b 20 00 mov 0x200b4a(%rip),%eax # 601018 4004ce: 83 c0 01 add $0x1,%eax 4004d1: 89 05 41 0b 20 00 mov %eax,0x200b41(%rip) # 601018 4004d7: b8 00 00 00 00 mov $0x0,%eax 4004dc: 5d pop %rbp 4004dd: c3 retq 4004de: 90 nop 4004df: 90 nop |
Before going further, since jump instructions are very important in any logical processing, here is a table of the most common jump operators.
|
Operator |
Meaning |
|
je |
Jump equals |
|
jg |
Jump greater |
|
jge |
Jump greater or equals |
|
jl |
Jump less |
|
jle |
Jump less or equals |
|
jmp |
unconditional jump, always taken |
|
jz |
Jump if “Zero” flag is set |
Many other jump instructions exist. We'll talk about them in due course if needed.
The rest of the article presents the if then else structure and loops. A detailed analysis of the code is not provided. However, the C version of the application is always shown after the assembly version to help you analyze the code yourself. By far the best approach is still to analyze the code in a debugger. Just don't forget to watch how the value of the eip (rip) register changes while debugging.
The following code example builds on the previous one. However, if the second element of the array is not smaller than the first, the second element is incremented.
|
.section .data nbPommes: .int 99, 100 .section .text .globl _start _start: nop movl $1, %esi movl nbPommes(,%esi,4), %eax cmpl %eax, nbPommes jle less incl nbPommes jmp end less: incl %eax movl %eax, nbPommes(,%esi,4) end: movl $1, %eax movl $0, %ebx int $0x80 |
int nbPommes[2] = {200, 100}; int main(){ if (nbPommes[0] > nbPommes[1]){ nbPommes[0]++; }else{ nbPommes[1]++; } return 0; } |
Now, since the assembly (pun intended...) of logic structures in assembly language looks very similar for all of them, here is an example of how a loop could be implemented in assembly. This time, the C code isn't provided! Analyzing it is up to you! But watch out, this one may require a bit of research on your part ;)
|
.section .data nbPommes: .int 99, 100 .section .text .globl _start _start: nop movl $4, %ecx movl $0, %eax loop: addl %ecx, %eax decl %ecx jz end jmp loop end: movl $1, %eax movl $0, %ebx int $0x80 |
There you go! That wraps up week 3 of x86 assembly month! Between now and next week, if you have any questions, don't hesitate to contact us!