This post was originally published in French only. We translated it in 2026 so the archive reads the same in both languages. Read the original →
June takes on a special flavor this year on the Hackfest blog: four articles on assembly programming will be published, one each week, and the month will be capped off with a HackerSpace presentation on the topic. Hopefully you'll learn something! Here is the last article in this series. The articles for week 1, week 2 and week 3 are also available.
Here we are, the last article in the series on assembly programming. Today, we'll talk about system calls as well as using the functions made available by the C libraries. At the very end, we'll see how to write our own functions in assembly and how to call the new functions we've prepared.
“System calls”
Every operating system offers a programming interface to the system, meant to be used by programmers to make their work easier. This interface, through system calls, gives programmers the chance to use the various features of the operating system they're programming on without having to write the code that interfaces the hardware with their program themselves. You'll have understood, then, that a programmer who uses system calls automatically makes their code dependent on the operating system they're developing for. The following figure shows a diagram of the interaction between the programmer and the operating system.
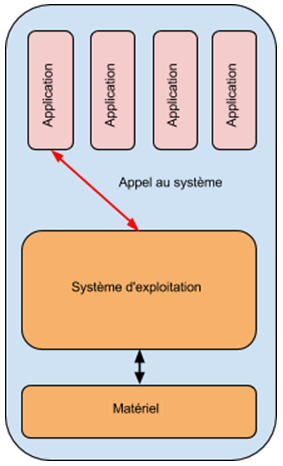
So you'll have understood that the operating system exposes its features through system calls. Everything from memory management to access to the various peripherals can therefore be done using “system calls”.
Using system calls
Until now, the snippets of code we've written couldn't interact with the user at all. These programs could only be observed using a debugger. We'll now use system calls to display information on the console while an application runs. The following figure shows an example of an application using two system calls. The first one writes the text “Hello World \n” to the console, while the second one ends the application's execution normally.
|
.section .data message: .ascii "Hello World\n" .section .text .globl _start _start:
#Préparation du system call movl $4, %eax movl $1, %ebx movl $message, %ecx movl $12, %edx int $0x80 # Appel du system call #Préparation du system call movl $1, %eax movl $0, %ebx int $0x80 # Appel du system call |
On Linux, a system call is made in 3 steps:
-
Choosing the call to be made
-
Passing the parameters
-
Making the call as an interrupt
Choosing the call to be made always uses the eax register. You have to put the number of the function you want to call in the eax register before calling the function in question. In this case, the first system call uses number 4 (the write function). This function takes 3 parameters:
-
A file descriptor
-
A message or buffer to be written
-
The size of the buffer to be written
The parameters, as you'll have guessed, are passed through the ebx, ecx and edx registers. Note that in this case it's necessary to specify the size of the buffer.
The third step is to trigger the call to the desired system function. In this case, interrupt 0x80 is used to tell the kernel that we want to call a system function.
The second system call made in the application uses function 1 (the exit function) to exit the application. Until now, we've been using this function without wondering what it was for. This function takes only one parameter, the return code. This code is passed as a parameter using the ebx register. In this case, this system call can very well be compared to using “return 0;” at the end of a C program.
You can now compile and run the application. You should see the message “Hello World” appear on the console.
|
$ as -gstabs --32 -o systemCalls.o systemCalls.s $ ld -m elf_i386 -o systemCalls systemCalls.o $ ./systemCalls Hello World |
In the previous example, no return value is needed. However, if a value were returned to the calling code, that value would be placed in the eax register when execution returns. So now you know how to use “system calls”. For those who'd like to see a complete list of the various system calls available on Linux, check out this link: http://syscalls.kernelgrok.com/ Careful: for those who want to work in 64-bit mode, this list can't be used, since several major changes were made in the move to 64 bits. You can find an explanation of the main differences between 32- and 64-bit Linux ASM programming at: http://www.exploit-db.com/papers/13136/ Also, as far as I'm concerned, the best source of information on 64-bit system calls is still simply reading the kernel's "H" files.
Now, even though we're able to use system calls, in many situations it can be handy to use functions found in the C libraries. You can use all of the C functions inside an ASM application. Since we're working with 32-bit code, if you're on a 64-bit system you'll need to install the required 32-bit tools to be able to run your applications. The following figure shows the commands to run to install the missing tools on 64-bit Ubuntu 12.04 in order to compile 32-bit assembly programs.
|
# apt-get install ia32-libs # apt-get install gcc-multilib # ldconfig |
After these three commands, you should have everything you need to continue with the rest of this article.
The following figure revisits the previous example, this time using the C function printf instead of the write system function.
|
.section .data message1: .asciz "Hello %s" message2: .asciz "World \n"
.section .text .globl _start _start: pushl $message2 pushl $message1 call printf addl $8, %esp movl $1, %eax movl $0, %ebx int $0x80 |
As you can see, several new instructions appear in this block of code. These new instructions are tied to how the application's execution stack works; the “stack”. The stack contains data needed for the application to run properly. So the block of code:
|
pushl $message2 pushl $message1 call printf addl $8, %esp |
is actually equivalent to calling the printf function like this:
|
char * message2 = “World\n”; printf(“Hello %s”, message2); |
Note that the order of the parameters sent to the printf function is reversed! To understand why, you just need to look more closely at how the stack works. Let's set the previous code aside for a moment to see how the stack works...
The stack
For the stack to work, a pointer must “point” to the top element of the stack. In an x86 processor, the esp register plays the role of the “top-of-stack pointer”. This register must therefore point to the top of the stack to ensure that the various instructions that change the stack work properly. The following figure shows an example of a stack along with the esp register pointing to its top.
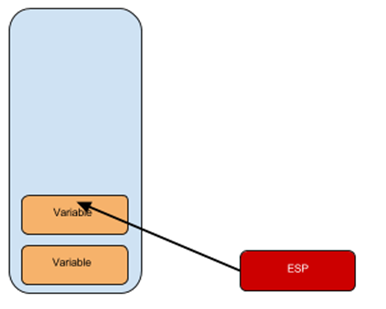
If an element is added to the stack, the value of the ESP register will be modified so that the esp register always points to the top of the stack. The following figure shows an element being added to the stack.
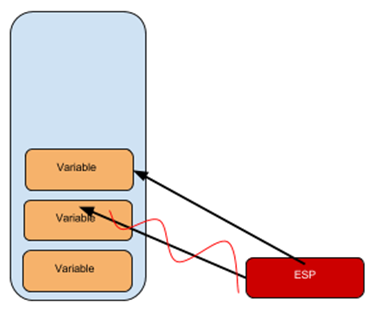
So the esp register no longer points to the original element but to the new element freshly added to the stack. In x86 assembly, we'll use the “push” and “pop” instructions to add and remove elements from the stack. To observe how the stack behaves as it changes, nothing beats an example! Compile the following code and run it in a debugger. While it runs, take the time to watch the value of the esp register (or rsp if you're in 64-bit). Also take the time to watch how the values in the various registers involved change.
|
.section .data message: .asciz "On aime tous la stack\n"
.section .text .globl _start _start:
movl $50, %eax pushl %eax movl $100, %ebx pushl %ebx movl $150, %ecx pushl %ecx
pushl $1000 popl %eax popl %ebx popl %ecx
popl %edx pushl $message popl %eax
pushl %eax call printf addl $4, %esp
movl $1, %eax movl $0, %ebx int $0x80 |
Note that to compile this program you'll need to link the C library with your application. The two commands required are:
|
$ as -gstabs --32 NomFichier.s -o NomFichier.o $ ld -dynamic-linker /lib/i386-linux-gnu/ld-2.15.so -lc -m elf_i386 NomFichier.o -o NomFichier |
It's important to know that you'll have to replace “/lib/i386-linux-gnu/ld-2.15.so” with the location of your own dynamic linker.
By watching how this program behaves, you should mainly notice two key things. First, the stack “grows” downward. That is, when an element is added to the stack, the value of the stack pointer esp decreases. Conversely, when an element is removed from the stack, esp increases. Second, the first element put on the stack is the last one to be removed. You could very well use the stack to reverse a character string. As an example, the program shown in the following figure uses the stack concept to reverse the message in the message1 variable into the message2 string. If the previous example didn't make the stack principle click for you, this one should do the trick :) Note that you may have to do a little research on the “al” register to fully understand this example...
|
.section .data message1: .asciz "We Love The Stack" message2: .asciz "We Hate The Stack" output: .asciz "%s\n" .section .text .globl _start _start: movl $message1, %esi movb (%esi), %al #Positionnement des caractères sur la pile pushContinue: pushl %eax inc %esi movb (%esi), %al cmp $0, %al jne pushContinue movl $message2, %esi #Retrait des caractères de la pile et #positionnement de ceux-ci dans message2 popContinue: popl %eax movb %al, (%esi) inc %esi movb (%esi), %bl cmp $0, %bl jne popContinue #Impression des résultats pushl $message1 pushl $output call printf addl $8, %esp pushl $message2 pushl $output call printf addl $8, %esp #Fin du programme movl $1, %eax movl $0, %ebx int $0x80 |
Back to function calls...
Before we veered off into explaining how the stack works, we were talking about calling C functions. So, if we take just the code that calls the printf function, like this:
|
pushl %eax call printf addl $4, %esp |
As you can see, a “push” is done before calling the C function. This push is used to add the function's parameters to the stack. When the function is called, it will get its information from the stack. But careful: the called function does not “pop” the elements added by the calling code. That's why the addl instruction is used after the function call to restore the stack's alignment. If you're not quite sure you understand this mechanism, here's another example. Compile and run the following code using a debugger.
|
.section .data print2Param: .asciz "il y a %d pommes dans le sac.\n" print1Param: .asciz "Bonjour tout le monde.\n" .section .text .globl _start _start: pushl $print1Param call printf addl $4, %esp pushl $50 pushl $print2Param call printf addl $8, %esp movl $1, %eax movl $0, %ebx int $0x80 |
Watching how this application works should help you clearly understand the principle of calling C functions from assembly code. You'll notice that, because of how the stack works, the parameters are pushed onto the stack in reverse order during calls (normally we have printf(StringAvecFormat, variableAAjouterDansFormat)). Also, the value used with the “addl” command following a function call varies depending on the number of bytes added to the stack during the function call. The following graphic shows how the stack evolves while the application runs (outside of the call to the printf function).
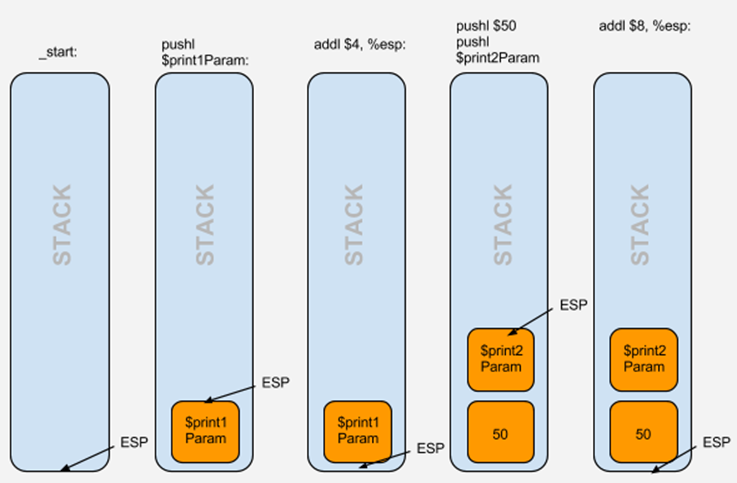
As you can see, the values “stay behind”. They'll actually be “erased” the next time something is pushed onto the stack.
There you go! You now know the basics of x86 assembly language as well as a few techniques you can use to call C functions and system functions! What a month ;)
See you at the HackerSpace to find out what all this could possibly be good for :)